Jonny Winter
☕
Network engineer, coffee devotee & IT professional
Deploying a Python Flask app in IIS

“Flask is a lightweight WSGI web application framework. It is designed to make getting started quick and easy, with the ability to scale up to complex applications. It began as a simple wrapper around Werkzeug and Jinja and has become one of the most popular Python web application frameworks.” - Armin Ronacher on The Pallets Projects
Summary
Python has quickly become a very, if not the most, popular programming language, and Flask is a framework that can be used to run web apps within it. Flask can scale from small apps to much larger ones, but when compared with other alternatives, like Django, it is suited to smaller applications. For me, Flask is simple, easy to use and quick to troubleshoot, so I think of it when I think of web apps. Although Flask has the ability to run a web server, it’s not designed for production purposes like IIS or Apache are - as I’m an avid Windows user I’m sticking with IIS. With the addition of WSGI (Web, Server, Gateway & Interface) we can pass requests from IIS to Flask. In this post I’m going to show the steps required to get IIS to serve a Flask app, display a .html web page and pass data between them.
Requirements
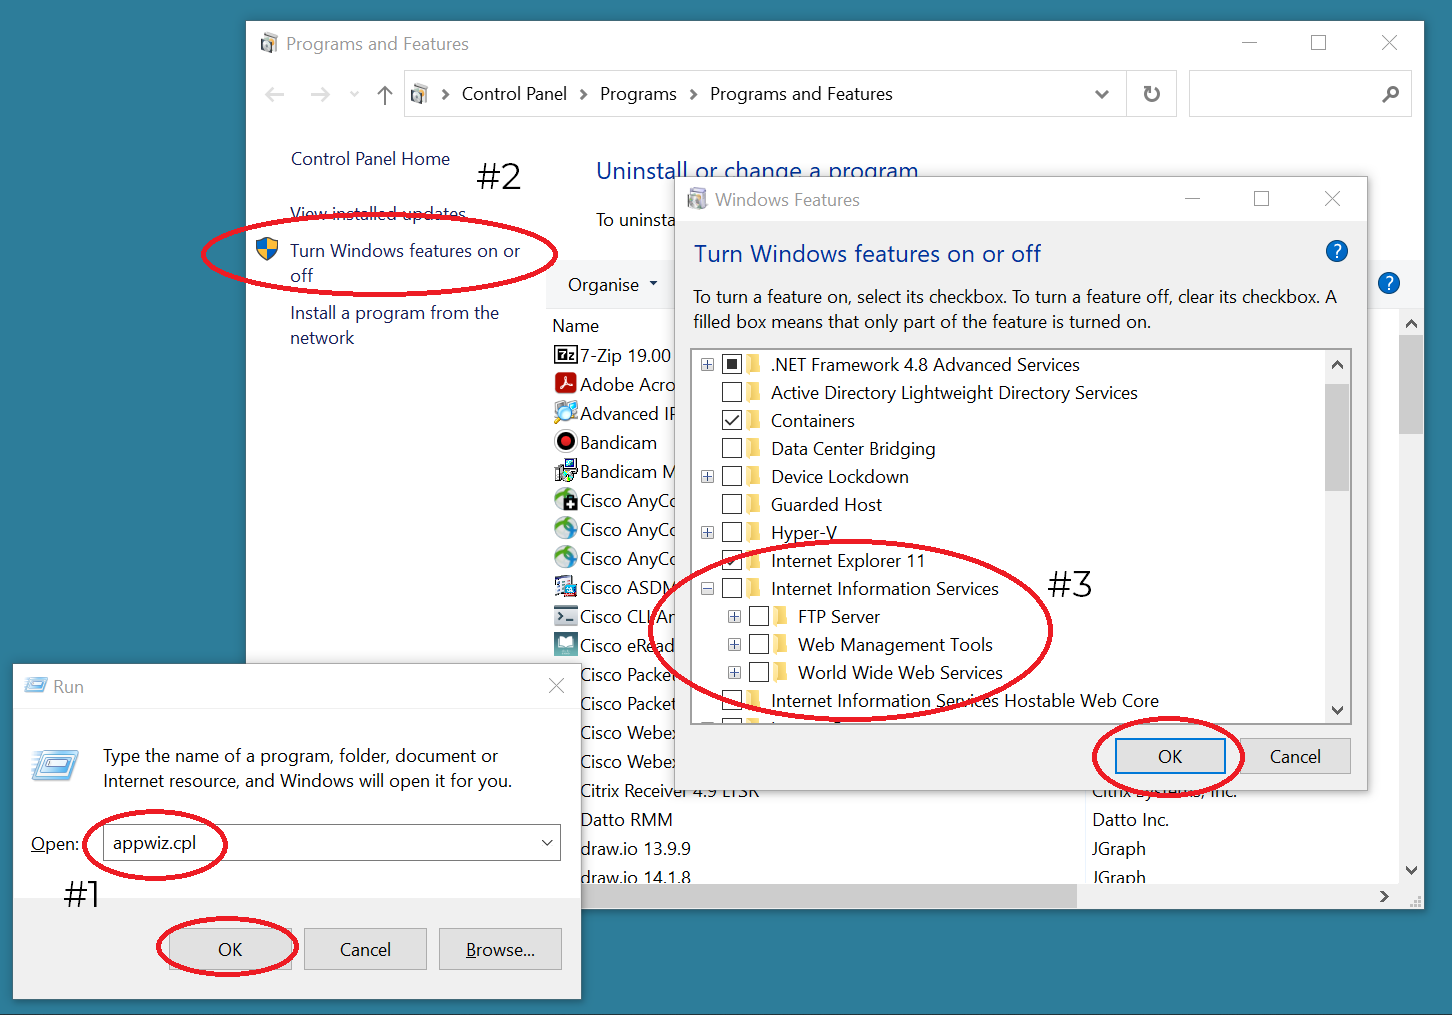
Other than the free software, you will need a copy of Windows Server. You can install the IIS features in Windows (10) Pro to bypass this, but you’re not realistically going to use a desktop OS as your web server. However, if you wanted to perform the bits on a Windows Desktop OS, you’ll be able to install IIS by -
- Open up the Programs and Features control panel applet (or use run dialog + appwiz.cpl).
- Click Turn Windows features on or off.
- Locate Internet Information Services.

My Environment
Coffee: Timana, Colombia from Union Hand-Roasted Coffee
Music: Hello Nasty by Beastie Boys
OS: Windows Server 2012 Datacenter (but also tested on Windows 10 Pro v20H2 x64).
IDE: Visual Studio Code v1.52.1
Tip o’ the Hat
The Flask documentation by Pallets
Bilal Bayasut’s post on Medium
The WFastCGI documentation by Microsoft
This Stack Overflow post answere by William Sousa
KiranH’s post and document in the Microsoft Tech forum
Michael Fore’s video on YouTube (and GitHub)
Prateek’s post on Codementor
Let’s begin
<NOTE>: Instead of re-inventing the wheel and explaining things that have been well defined by someone else, I have included links next to some words/technologies/acronyms/protocols that I feel could proove useful to those not yet ‘in the know’. </NOTE>
Get logged into the server you wish to host your web app on and follow the numbered steps below (text borrowed from the IONOS by 1&1 help page) to get IIS installed, or run the PowerShell command below -
Install-WindowsFeature -name Web-Server -IncludeManagementTools
Install-WindowsFeature -name Web-CGI
#Or
Install-WindowsFeature -Name Web-Server -IncludeAllSubFeature
- Press the Windows key and select Server Manager.
- In the Server Manager Dashboard, click Manage > Add Roles and Features.
- Click Installation Type.
- Select the Role-based or feature-based installation option and click Next.
- Select the server on which you want to install IIS and click Next.
- Activate the Web Server (IIS) role.
- To add the IIS Management Console, click Add Features.
- Click Next. The Select Features window will open.
- Click Next. The Web Server Role (IIS) window will open.
- Click Next. The Select Role Services window will open.
- Select CGI under Application Development Features and click Next.
- To install the selected roles, role services, and features, click Install.
- To complete the installation, click Close.
Easily done. Next, let’s get Python installed. Download the Python 3.9.0 installer and open it up. In the installation process choose Customize installation and in the Advanced Options window that pops up, tick the box for Install for all users is selected so that the install location changes to C:\Program Files\Python39.
When Python installs, it installs pip - the Python package manager. But, because Flask is pre-packaged with Python, we don’t have to run any pip commands for it. However, it is worth making sure everything is up-to-date. To do this, open up PowerShell and type -
pip install pip --upgrade
pip install Flask --upgrade
As breifly explained in the summary, we need WSGI to pass requests from IIS to Flask. More specifically, we’re going to use WFastCGI - which uses both WSGI (Web, Server, Gateway & Interface) & FastCGI (Fast Common Gateway Interface). This will need to be installed by pip and then activated. To do this, open up PowerShell as an administrator and use the following commands -
pip install wfastcgi
#... and once WFastCGI is installed
wfastcgi-enable
Getting there! We now need to create a directory for your application. When IIS is installed it creates a directory under %SYSTEMDRIVE%\inetpub\wwwroot, create a new folder here to host your application. The great thing about using this directory is that the permissions required by IIS/unauthenticated web users is automatically applied. My directory & application will be called app, just to keep it simple. So - %SYSTEMDRIVE%\inetpub\wwwroot\app.
As we’re going to be utilising Flask here, we will need to create a sub-directory called templates which will be used to host all of our .html files. So - %SYSTEMDRIVE%\inetpub\wwwroot\app\templates. If you are looking to serve images as well, create an additional sub-directory in the root directory called static with another sub-directory called images. So - %SYSTEMDRIVE%\inetpub\wwwroot\app\static\images.
Now we’ve got our directories sorted, create a Python code file for your application inside the root of your application. For me, I’m going to name it the name of my app. The resulting file will be called app.py in my case. So - %SYSTEMDRIVE%\inetpub\wwwroot\app\app.py. To create the file, simply open Notepad on the server, click File > Save, locate the new root of the application directory and save the file as app.py, changing Save as type to All files. Using that same method, create a .html file inside the templates directory, i.e. home.html. So - %SYSTEMDRIVE%\inetpub\wwwroot\app\templates\home.html.
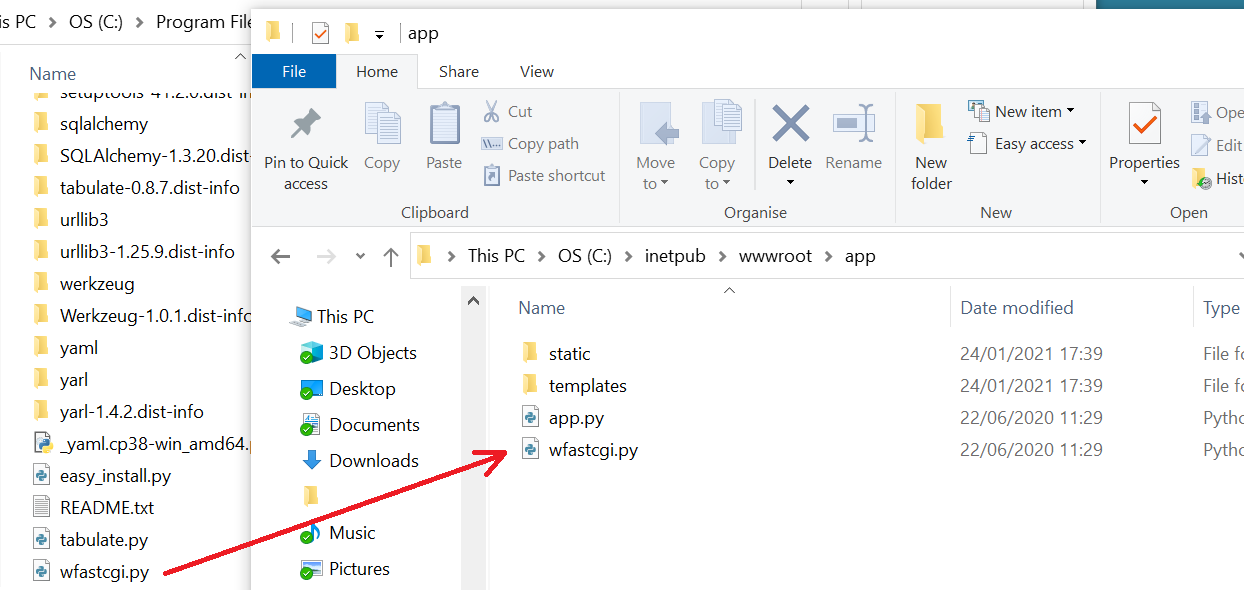
Next step is to copy a file created by WFastCGI when we installed it into the root directory of our application. The file we need to copy is located - %SYSTEMDRIVE%\Python39\Lib\site-packages\wfastcgi.py. So, you need to end up with a copy of that file located - %SYSTEMDRIVE%\inetpub\wwwroot\app\wfastcgi.py.
At this point, we really need to open up IIS and make a few changes. I’ve documented them below with some information against specific steps -
- Open IIS (or run the command inetmgr.exe).
- (OPTIONAL) Locate Default Web Site under Server > Application Pools > Sites, right click it and click Stop under Manage Website.
- (OPTIONAL) Right click Default Web Site again, and within Manage Website click Advanced Settings.
- (OPTIONAL) Change the value next to Start Automatically to False.
- Create a new site by right clicking Sites and selecting Add Website…
- Give the site a name, i.e. app, in the Site name field.
- Ensure DefaultAppPool is selected under the Application pool field.
- Next to Physical path enter the root directory of your application, i.e. - %SYSTEMDRIVE%\inetpub\wwwroot\app
- Leave the section bindings default (the points above marked OPTIONAL could aid here if you choose to have All Unassigned selected, but you could easily select a single IP address assigned to your server, i.e. 192.168.0.2 (as an example)).
- Click OK to create and start the website.
- Breathe.
- Click the newly created site under Sites and double click Handler Mappings. Right click the empty space, or go to the Actions pane on the right hand side and select Add Module Mapping….
- Set the Request path to be * , Module to be FastCgiModule, Name to be Flask and Executable to be the following string, all one string (no spaces) - %PROGRAMFILES%\Python39\python.exe|%SYSTEMDRIVE%\inetpub\wwwroot\app\wfastcgi.py
- Click Request Restrictions… and uncheck the checkbox against the wording Invoke handler only if request is mapped to.
- OK both the Request Restrictions window and the Add Module Mapping Window and once it pops up, click Yes to create a FastCGI application.
- Click your server’s name inside the Connections pane on the left, then double click FastCGI Settings.
- Locate the newly created FastCGI application, right click it and select Edit.
- Click the word (Collection) then the […] button next to Environment Variables.
- Add in two new members, one with the Name of PYTHONPATH with the Value %SYSTEMDRIVE%\inetpub\wwwroot\app\, the other with the Name of WSGI_HANDLER and the Value app.app. Here, replace the first app of that with the name of the python script file you created earlier - i.e. I created app.py, so this is app.app. If you created yours as coolscript.py then this would be coolscript.app.
- Click OK in the EnvironmentalVariables Collection Editor window and OK in the Edit FastCGI Application window behind it.
With the IIS ‘stuff’ complete. We’re about ready towrite some Python code & serve a web page! You don’t have to use an IDE, like VScode, but it does help a lot. However, for the sake of this post I’m only going to reference the code itself - so feel free to simply use Windows notepad or something like Notepad + +. Open up your app.py (or whatever you called your application Python file) and copy/paste in the following code, followed by saving the file -
from flask import Flask, render_template

var = "Hello, World!"

app = Flask(__name__)

@app.route("/")
def home():
    return render_template("home.html", data = var)

if __name__ == "__main__":
    app.run()
Decoding the above Python code, we have a few things -
- from flask import Flask, render_template - this line loads the Flask & render_template modules from the Flask so we can use them in our code.
- var = “Hello, World!” - this line creates a variable called var and sets it to hold the string “Hello, World!”. We’ll display this in our home.html file.
- app = Flask(_name_) - this line instantiates Flask and passes the name argument to it.
- @app.route(“/”) - this line tells the Flask what code to run when it recieves a HTML GET request against it, i.e. http://ipaddress. This could be set to “/home” but your GET URL would have to be http://ipaddress/home.
- def home(): - this is function that holds the code that the HTML GET request runs once it is recieved.
- return render_template(“home.html”, data = var) - this line tells Flask to serve the home.html file and to pass it a variable called data, with the content of the var variable.
- if _name_ == “_main_”: & app.run() - these lines tell the next line to function only if it’s being called by itself, not as module in another Python app.
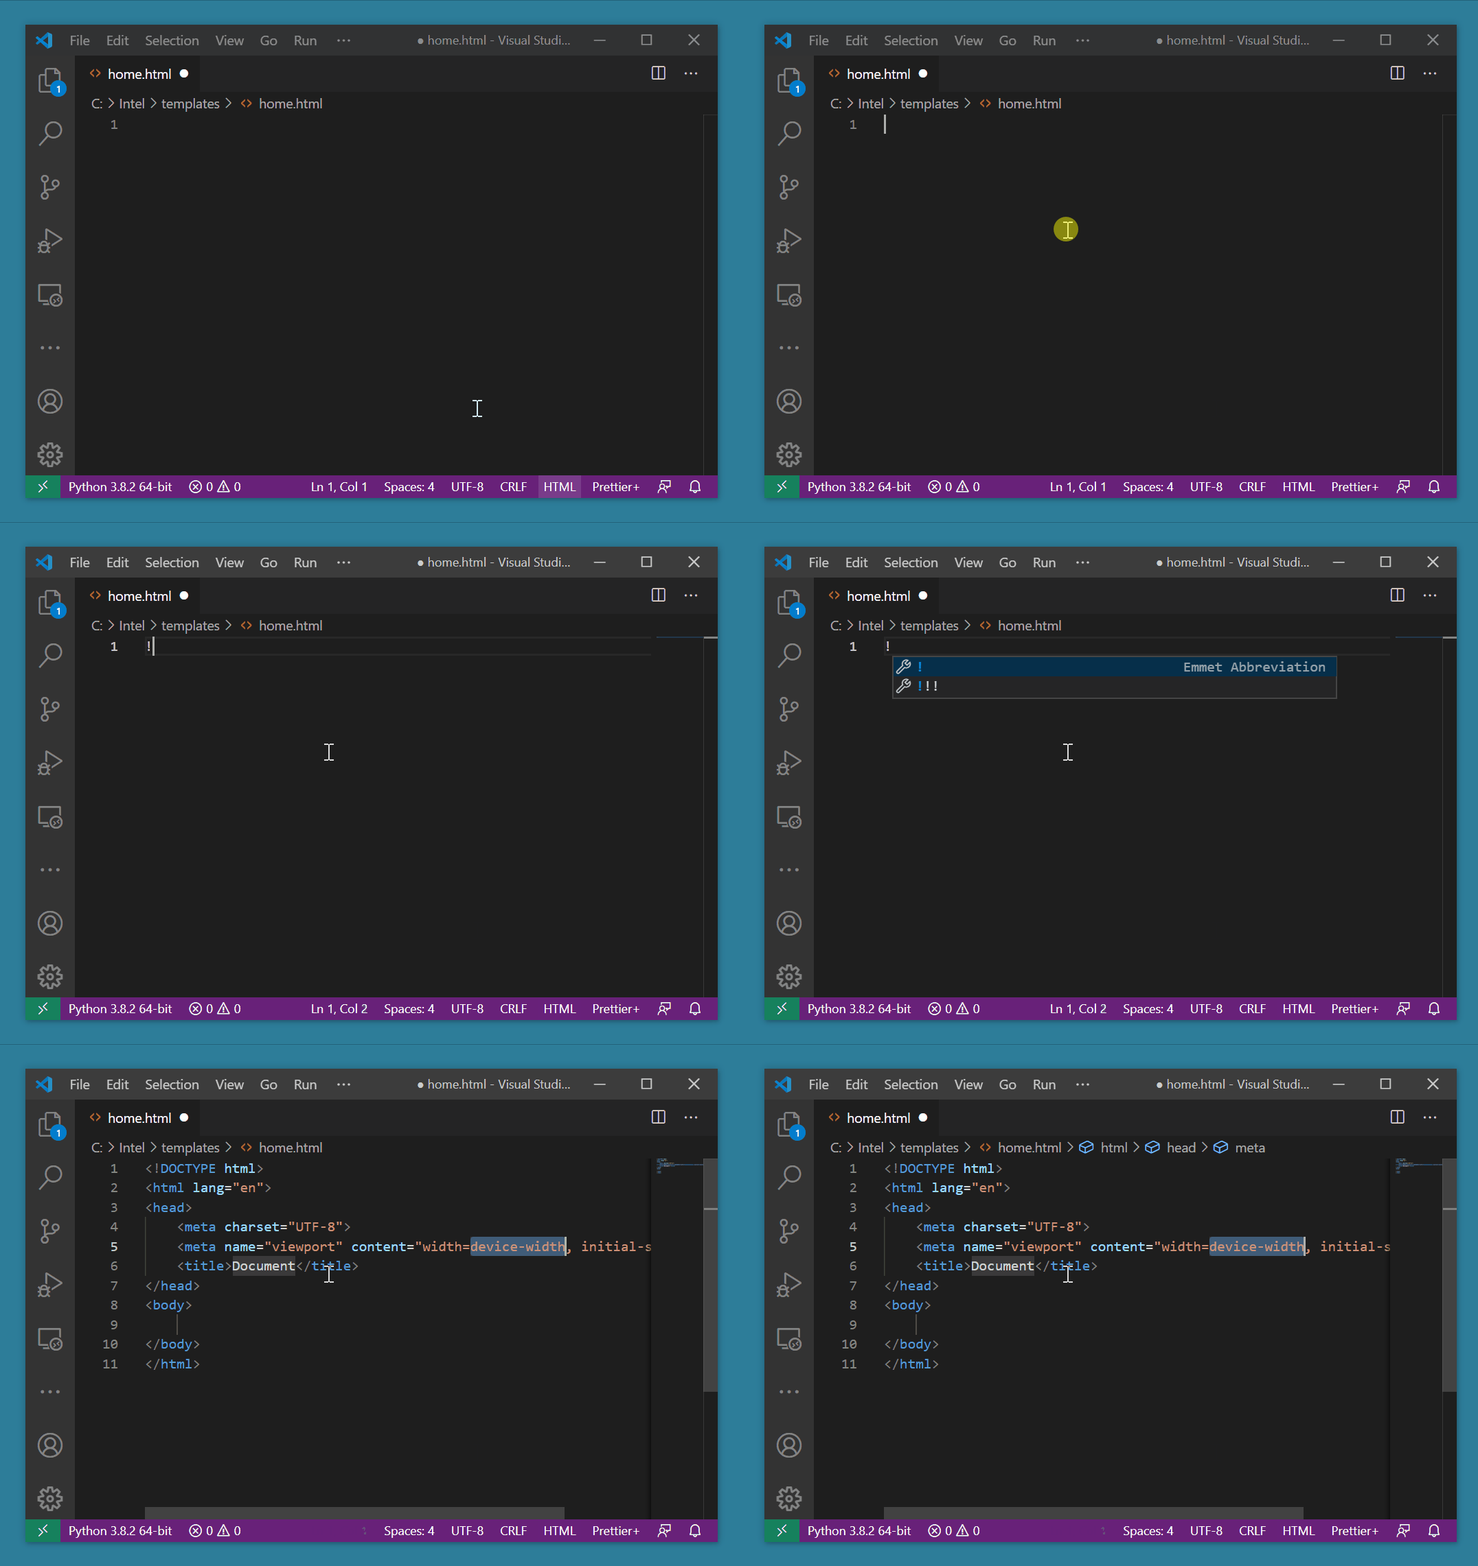
Lasly, we need to populate our .html file with some simple code. If you’re using VScode, simply type an exclamation mark followed by the return key to add the box standard boilerplate -
 …if not, simply paste the text below into your .html file -
<!DOCTYPE html>
<html lang="en">
<head>
    <meta charset="UTF-8">
    <meta name="viewport" content="width=device-width, initial-scale=1.0">
    <title>Document</title>
</head>
<body>

</body>
</html>
The only change from the boilerplate here is the addition of ** which is Jinja2 syntax. All it is doing is displaying the data variable, which is which was formed of the var variable. Although this is simply a string of data, this could be an aray of data that could populate a HTML table, as an example.
Well, mission accomplished. We’ve got an IIS web server with WSGI passing requests to a Python file running Flask.
Happy scripting!
Written on January 24th, 2021 by Jonny Winter