Jonny Winter
☕
Network engineer, coffee devotee & IT professional
Creating VLANs via CSV Using the Meraki API and Flask

“Meraki Dashboard API - A RESTful API to programmatically manage and monitor Meraki networks at scale. What can you do with it? Add new organizations, admins, networks, devices, VLANs, and more.” - Meraki API Docs on developer.cisco.com
Summary
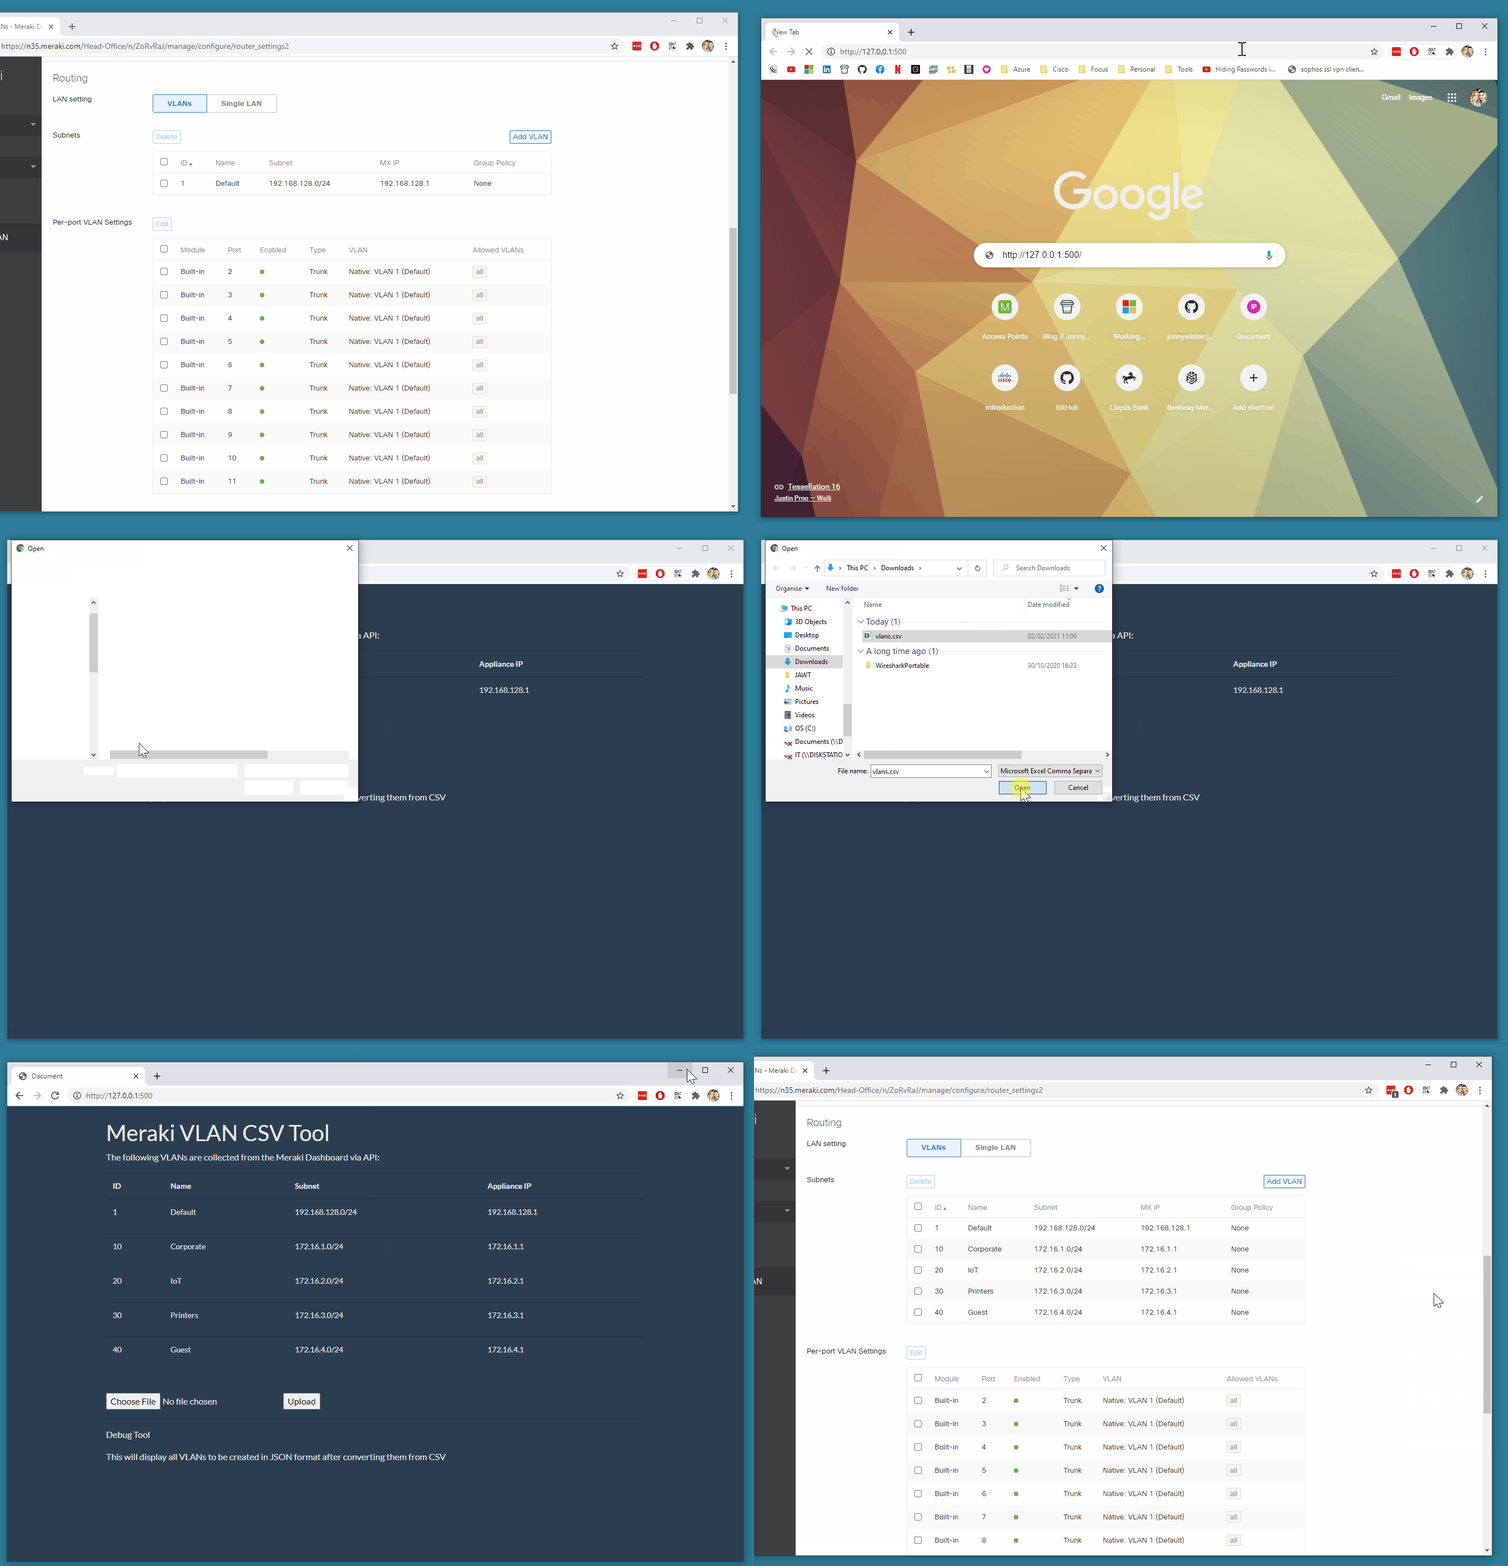
Over the last two posts, I’ve documented some how-to’s using the almighty Flask, the Python package. However, in this post I’m going to document a project - this project is a small Flask web app that enables you to bulk create MX VLANs using the Meraki API. With minor alteration this could be used to iterate over hundreds of networks’ worth of MXs, or be ammended to create firewall rules, etc., etc. To show the tool in action, here’s a GIF of it working on my PC -
My Environment
Coffee: Bobolink, Brazil from Union Hand-Roasted Coffee
Music: Paul’s Boutique by Beastie Boys
OS: Windows 10 Pro v20H2 x64.
IDE: Visual Studio Code v1.52.1
Browser: Google Chrome v88
Tip o’ the Hat
Manav Kothari’s response on Stack Overflow
Mudassar Ahmed Khan’s post on ASP Snippets
This TechSlides article
Espoir Murhabazi’s response on Stack Overflow
The AJAX with jQuery documentation on The Pallets Projects.
Let’s Begin
<NOTE>: Instead of re-inventing the wheel and explaining things that have been well defined by someone else, I have included links next to some words/technologies/acronyms/protocols that I feel could proove useful to those not yet ‘in the know’. </NOTE>
To create a VLAN on a Meraki MX Security Appliance, the Meraki API documentation says to send a POST request to the following endpoint -
https://api.meraki.com/api/v1/networks/{networkId}/appliance/vlans
As a base, you can retrieve the below Python Requests code from the documentation page by clicking on Template on the far right. This will give you everything required to make the POST request to create a VLAN -
import requests

url = "https://api.meraki.com/api/v1/networks/{networkId}/appliance/vlans"

payload = '''{
    "id": "1234",
    "name": "My VLAN",
    "subnet": "192.168.1.0/24",
    "applianceIp": "192.168.1.2",
    "groupPolicyId": "101"
}'''

headers = {
    "Content-Type": "application/json",
    "Accept": "application/json",
    "X-Cisco-Meraki-API-Key": "YOUR API KEY HERE"
}

response = requests.request('POST', url, headers=headers, data = payload)

print(response.text.encode('utf8'))
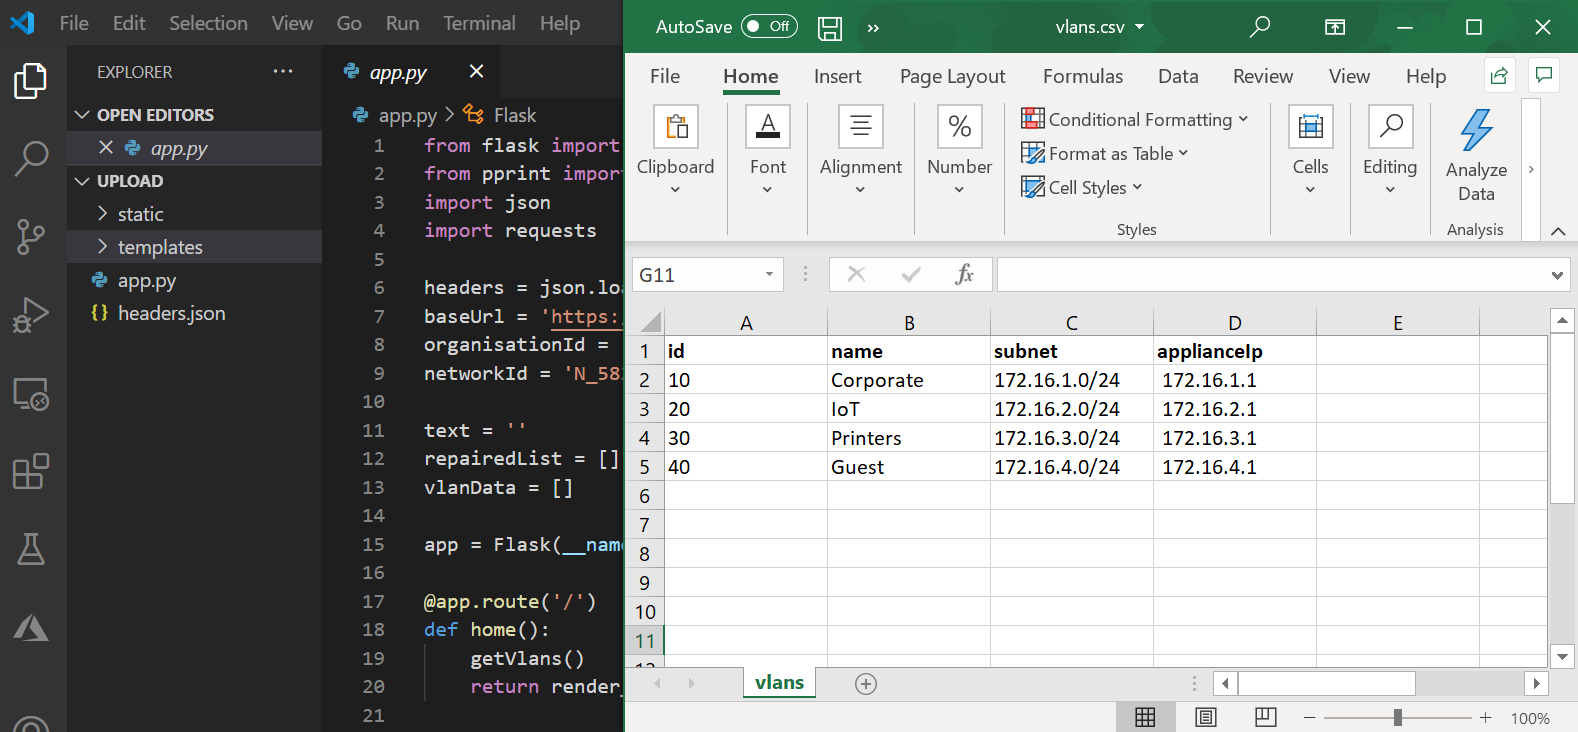
Like with the above, there is a quickstart Flask project ready to be copy & pasted from the Pallets Projects site. A great place to start. Using the Meraki & Flask quickstart code, I created the following project that works like the GIF at top of this post. The code is split into four files - Python, HTML & CSV. The Python file is in the root of the folder, the HTML must be inside a sub-folder called templates, the JavaScript must be inside a sub-folder of the root called static and the CSV file, which can live anywhere, is in the root. Here’s the code & notes next to each section -
Python
from flask import Flask, render_template, redirect, url_for, request, jsonify
import json
import requests

headers = {
    "Content-Type": "application/json",
    "Accept": "application/json",
    "X-Cisco-Meraki-API-Key": "YOUR API KEY HERE"
}
baseUrl = 'https://api.meraki.com/api/v1'
networkId = 'YOUR NETWORK ID HERE'

text = ''
repairedList = []
vlanData = []

app = Flask(__name__)

@app.route('/')
def home():
    getVlans()
    return render_template("home.html", jsonData = vlanData)

@app.route('/receive', methods=['POST'])
def receive_data():
    global text
    global repairedList

    text = request.get_json()

    for i in text:
        repairedDict = {}
        for key, value in i.items():
            repairedDict[key.strip()] = value.strip().replace("\r","")
        repairedList.append(repairedDict)

    createVlans()

    redirect_json = {"redirect_url": url_for('home')}
    return jsonify(redirect_json)

def getVlans():
    global vlanData

    vlanData = []

    url = f"{baseUrl}/networks/{networkId}/appliance/vlans"
    vlanData = requests.request('GET', url, headers=headers).json()

def createVlans():

    url = f"{baseUrl}/networks/{networkId}/appliance/vlans"
    for i in repairedList:
        requests.request('POST', url, headers=headers, data=json.dumps(i)).json()

if __name__ == "__main__":
    app.run(
        host=("127.0.0.1"), port=int(500), use_reloader=True, debug=True)
- “jsonify serializes data to JavaScript Object Notation (JSON) format, wraps it in a Response object with the application/json mimetype.” - Matt Makai’s description on Full Stack Python.
- text = request.get_json() creates the text variable populated of the JSON formated version of the CSV file.
- for key, value in i.items():, repairedDict[key.strip()] = value.strip().replace(“\r”,””) & repairedList.append(repairedDict) strip the carriage return from the JSON variable added by JSON.stringify in the JavaScript.
- host=(“127.0.0.1”), port=int(500), use_reloader=True, debug=True) specifies the port & IP that the Flask server should run on.
- jsonData is iterated through in Jinja2 inside the HTML below.
HTML
<!DOCTYPE html>
<html lang="en">
<head>
    <meta charset="UTF-8">
    <meta name="viewport" content="width=device-width, initial-scale=1.0">
    <link rel="stylesheet" href="https://bootswatch.com/4/superhero/bootstrap.min.css">
    <script src="https://ajax.googleapis.com/ajax/libs/jquery/3.5.1/jquery.min.js"></script>
    <script src="./static/javascript.js"></script>
    <title>CSV Web App</title>
</head>
<body>
    <div class="container" style="max-width: 1000px">
        <br>
        <h1>Meraki VLAN CSV Tool</h1>
        <p>The following VLANs are collected from the Meraki Dashboard via API:</p>
        <div>
            <table class="table table-hover">
                <thead>
                    <tr>
                    <th scope="col">ID</th>
                    <th scope="col">Name</th>
                    <th scope="col">Subnet</th>
                    <th scope="col">Appliance IP</th>
                    </tr>
                </thead>
                <tbody id="myTable">

                </tbody>
                </table>
        </div>
        <div>
            <br>
            <input type="file" id="csvFileInput" accept=".csv">
            <input type="button" id="upload" onclick="handleFiles(csvFileInput.files)" value="Upload" />
            <hr />
            <p>Debug Tool</p>
            <p>This will display all VLANs to be created in JSON format after converting them from CSV</p>
            <p id="dvCSV">
        </div>
    </div>
</body>
</html>
- link rel=”stylesheet” href=”https://bootswatch.com/4/superhero/bootstrap.min.css” is loads the Superhero Bootstrap for styling.
- script src=”https://ajax.googleapis.com/ajax/libs/jquery/3.5.1/jquery.min.js” loads AJAX & jQuery.
- for vlan in jsonData is the Jinja2 for loop which populates n rows depending on the data passed to it by jsonData from the Python GET request to the Meraki API to retrieve the current VLANs. The rows inside the table reference the key value pairs inside the JSON.
- input type=”file” id=”csvFileInput” accept=”.csv” is the CSV file selector
- input type=”button” id=”upload” onclick=”handleFiles(csvFileInput.files)” value=”Upload” is the button that calls the first JavaScript function below.
JavaScript
//---FIRST FUNCTION
function handleFiles(files) {
    if (window.FileReader) {
        getText(files[0]);
    } else {
        alert('FileReader are not supported in this browser.');
    }
}
//---NEXT FUNCTION
function getText(fileToRead) {
    var reader = new FileReader();
    reader.readAsText(fileToRead);
    reader.onload = loadHandler;
    reader.onerror = errorHandler;
}
//---NEXT FUNCTION
function loadHandler(event) {
    var csv = event.target.result;
    process(csv);
}
//---NEXT FUNCTION
function process(csv) {
    var lines = csv.split("\n");
    result = [];
    var headers = lines[0].split(",");
    for (var i = 1; i < lines.length - 1; i++) {
        var obj = {};
        var currentline = lines[i].split(",");
        for (var j = 0; j < headers.length; j++) {
            obj[headers[j]] = currentline[j];
        }
        result.push(obj);
    }
    jsonResult = JSON.stringify(result);
    document.getElementById('dvCSV').innerHTML = jsonResult;
    postFunction(result);
}
//---NEXT FUNCTION
function errorHandler(evt) {
    if (evt.target.error.name == "NotReadableError") {
        alert("Cannot read file !");
    }
}
//---NEXT FUNCTION
function postFunction(text) {
    $.ajax({
        type: "POST",
        url: "/receive",
        data: JSON.stringify(text),
        contentType: "application/json",
        dataType: "json",
        success: function (redirect_json) {
            if (redirect_json.redirect_url) {
                window.location.href = redirect_json.redirect_url;
            }
        }
    });
}
CSV
id,name,subnet,applianceIp
10,Corporate,172.16.1.0/24, 172.16.1.1
20,IoT,172.16.2.0/24, 172.16.2.1
30,Printers,172.16.3.0/24, 172.16.3.1
40,Guest,172.16.4.0/24, 172.16.4.1
So that’s it. A working web app. As the summary stated, with simple modification and some imagination this code can be used to do a lot.
Happy scripting!
Written on February 7th, 2021 by Jonny Winter