Jonny Winter
☕
Network engineer, coffee devotee & IT professional
Azure Timer Triggers to Schedule Meraki API Calls

“Azure Functions is a serverless solution that allows you to write less code, maintain less infrastructure, and save on costs. Instead of worrying about deploying and maintaining servers, the cloud infrastructure provides all the up-to-date resources needed to keep your applications running. You focus on the pieces of code that matter most to you, and Azure Functions handles the rest.” - Azure Functions overview on microsoft.com
Summary
Creating code, developing ideas and putting ‘pen to papper’ can be hard, but finding a server to run your code can be harder. Especially when your code only needs to execute once a day, month or year - all of that compute simply wasted. Cue Azure Functions. As the quote above explains, Azure Functions lets you write the code, but the underlying infrastructure is taken care for. In effect, the compute behind your code ‘sleeps’ until triggered by a specified trigger - like a HTTP GET or scheduled time is met. In this post I’m going to create a Timer Trigger, which is one of the Azure Functions triggers to schedule an API POST to the Meraki API to change the PSK for a specified SSID once a day to a random, secure string.
My Environment
Coffee: Bobolink, Brazil from Union Hand-Roasted Coffee
Music: Celebrity Mansions by Dinosaur Pile-Up
OS: Windows 10 Pro v20H2 x64.
IDE: Visual Studio Code v1.53.2
Browser: Google Chrome v88
Tip o’ the Hat
Timer Trigger documentation on microsoft.com.
Azure Functions Core Tools installer & documentation on the Azure GitHub.
Technicaltutorial4u’s video on YouTube.
Cronitor’s website crontab.guru.
Vishal’s post on PYnative on random string generators.
Let’s Begin
<NOTE>: Instead of re-inventing the wheel and explaining things that have been well defined by someone else, I have included links next to some words/technologies/acronyms/protocols that I feel could proove useful to those not yet ‘in the know’. </NOTE>
Azure
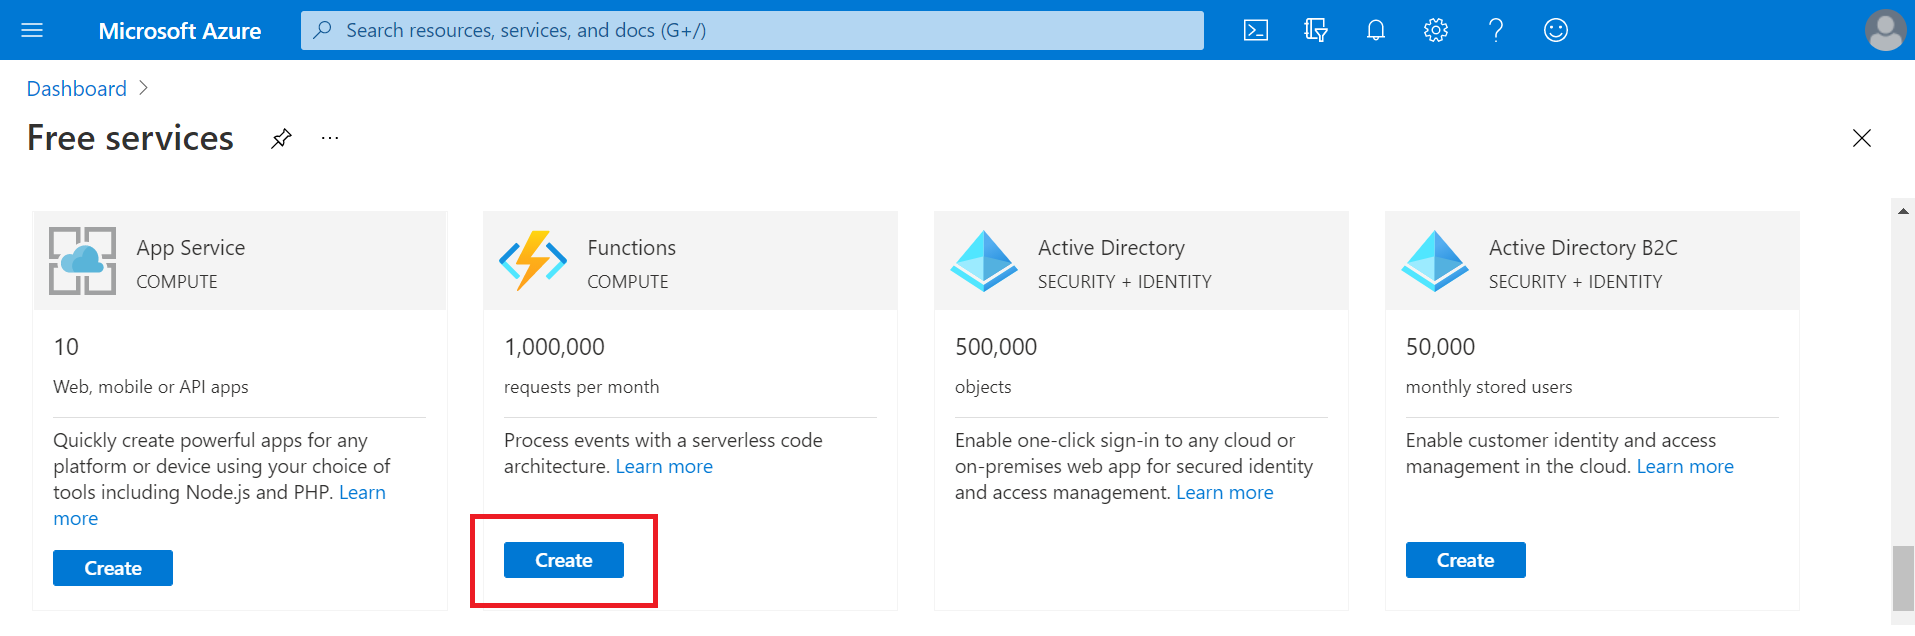
There’s a few places to start here, but lets start by getting logged into the Azure Portal and creating our Function. Once logged in, open up Free Services, locate Functions and click Create.
This will take you to a new page where you need to detail the specifics for the Function we’re creating. I’ve detailed these below -
Basics
- Resource Group > Create New > Name: Your Resource Group Name > OK. <- I will refer to this as myResourceGroupName
- Function App Nane: Your Function Name <- I will refer to this as myFunctionAppName
- Publish: Code
- Runtime Stack: Python
- Version: 3.8
- Region: Your region, in my case it was UK South
- Next.
Hosting
- Storage Account: Selected new one - default
- OS: Linux - default
- Play Type: Consumption (Serverless) - default
Review & Create
- Proceed, clicking OK and Create where required. Once your new Function has been created, you can minimise Azure until you want to delete the resource group or review the logs at the end of the post.
Visual Studio Code
Now your Function App has been created in the Azure Portal, get VSCode open (or installed & open), install & log into the Azure Account & Azure Functions extensions in that order and then click the Azure symbol on the Side Bar. With the Azure extensions now open, click to open Functions > Subscrtiption, in my case is Pay-As-YouGo > myFunctionAppName > Click the Create Function… symbol at the top (it like a lightning bolt) to create a new Function. This doesn’t duplicate the work you’ve done in the Azure Portal, in fact you can do the work that you did in the Azure Portal to create myFunctionAppName from here - but I prefer it this way.
Once you click Create Function… you will be required to put in some options. I’ve detailed the options I specified below -
- You will see a message box saying, “You must have a project open to create a function” - click Create new project.
- Create a new folder somewhere for your Function App code to live > click Select.
- Select Python as the language and then select your version, in my case 3.8.2.
- Click Timer Trigger and give it a name (default TimerTrigger1). Press the enter key.
- Specify the cron expression for the time formatting. Press the enter key.
- Lastly, click Open in current window to view the code.
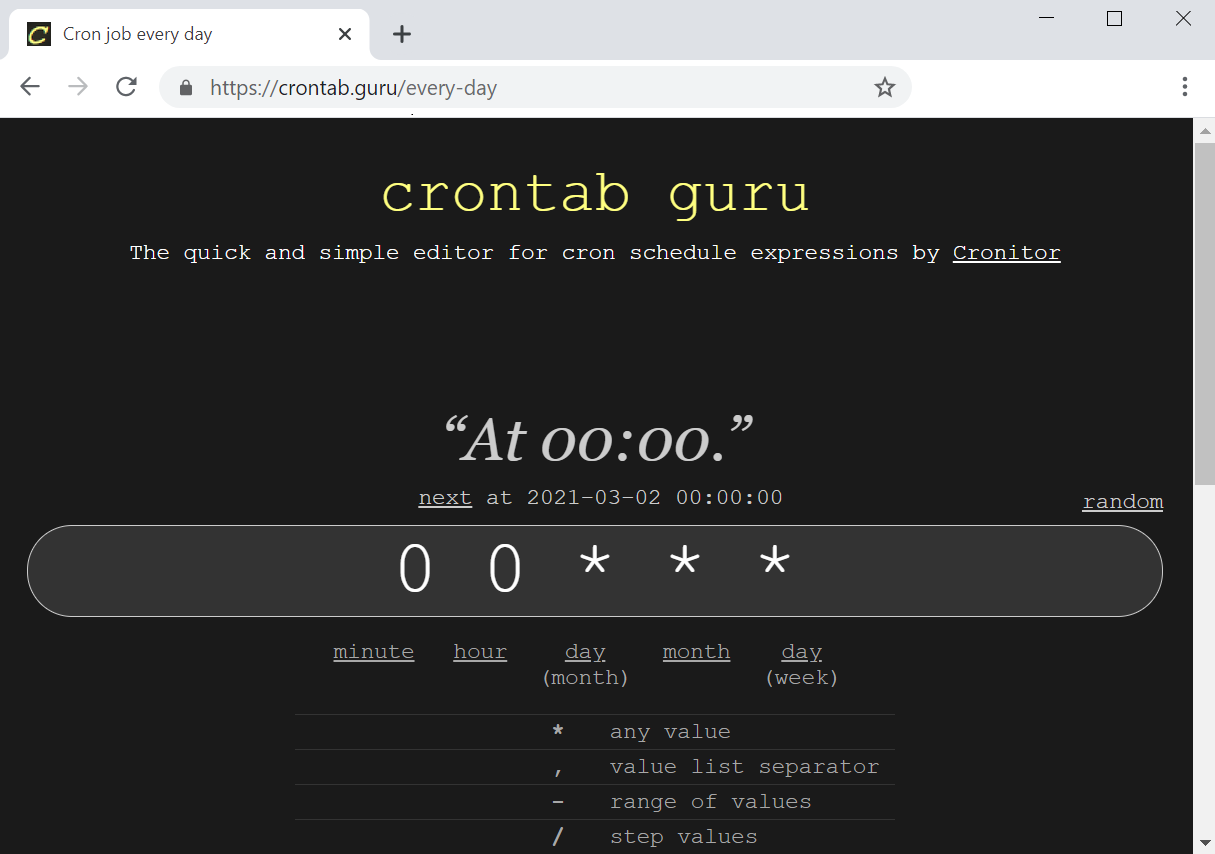
<NOTE>: Cron is a time schedule based software utility. Cron expressions are the values that specify when a schedule occurs. The Cron expression is outlined here. It takes a few moments to understand how it works, but once you ‘get it’ use this tool to create your string. I used this expression to specify once a day. My example is the pic below. </NOTE>
You will now see a bunch of files inside the folder you created. These are all required to make the Function app and Timer Trigger work. Locate init.py from within the TimerTrigger1 (or whatever you named it) directory. This .py file is the Python file that will execute the code on the schedule specified by the Cron expression.

Although we can create code from within the init.py file and run it using the Azure Functions Core Tools (link above), I’d keep it simple by creating a new .py file somewhere to create our Meraki API call to change the SSID. Create it, open it and paste in the following code. The code, although created from scratch/copied & pasted the base code can be obtained from developer.cisco.com here by clicking on Templates & Python-Requests on the right-hand side. To create the random string for the PSK, I used Vishal’s post in the Tip o’ the Hat section.
import requests
import random
import string

url = 'https://n23.meraki.com/api/v1/networks/{YOUR NETWORK ID HERE}/wireless/ssids/0'

headers = {
    'X-Cisco-Meraki-API-Key':'YOUR API KEY HERE',
    'Accept':'application/json',
    'Content-Type':'application/json'
}

preSharedKey_characters = string.ascii_letters + string.digits + string.punctuation
preSharedKey = ''.join(random.choice(preSharedKey_characters) for i in range(10))

body = '{"psk":"' + str(preSharedKey) + '"}'

response = requests.request('PUT', url, headers=headers, data=body)

print(response.status_code)
<NOTE>: I’m not going to delve into how to get a network ID here, but you can get some more information from my previous post here. I apreciate that it is in PowerShell, but the information still applies here.
Although the code above and below doesn’t programatically ‘tell’ anyone/anything of the string that you’re setting the Wi-Fi SSID PSK to, this can be sent to an endpoint via webhook by simply sending data in a JSON payload (an example here of someone sending it to Slack) or emailed to someone (an example here of someone sending an email via Office 365) as an example. </NOTE>
Test your version of the code above by running it in VSCode. If all is well, proceed to integrate it into the init.py file so that it reads as follows -
import azure.functions as func
import datetime
import logging
import random
import requests
import string

def main(mytimer: func.TimerRequest) -> None:
    utc_timestamp = datetime.datetime.utcnow().replace(
        tzinfo=datetime.timezone.utc).isoformat()

    preSharedKey_characters = string.ascii_letters + string.digits + string.punctuation
    preSharedKey = ''.join(random.choice(preSharedKey_characters) for i in range(10))

    url = 'https://n23.meraki.com/api/v1/networks/L_575897802350005790/wireless/ssids/0'

    headers = {
        'X-Cisco-Meraki-API-Key':'YOUR API KEY HERE',
        'Accept':'application/json',
        'Content-Type':'application/json'
    }

    body = '{"psk":"' + str(preSharedKey) + '"}'
    response = requests.request('PUT', url, headers=headers, data=body)

    logging.info('Python timer trigger function ran at %s', utc_timestamp)
Once you’ve changed the .py file to the above, you will need to modify the requirements.txt file in the root of the folder you created. Some information on the requirements.txt file for Azure Functions can be found here. We don’t need to add a requirement for all modules we imported into our code as most of them are loaded by default, only for requests. The requirements.txt file should look like this -
# DO NOT include azure-functions-worker in this file
# The Python Worker is managed by Azure Functions platform
# Manually managing azure-functions-worker may cause unexpected issues

azure-functions
requests
Now both init.py and requirements.txt have been modified, we are ready to deploy our Function App to Azure. To do this, go to the Azure Extension > click Functions > click your subscription name, in my case Pay-As-You-Go > right click myFunctionAppName followed by Deploy to Function App > in the message box that shows up, click deploy & wait. It will take a few minutes but your app will deploy. Success!
<NOTE>: This note kind of goes without saying, but if you don’t want to wait for your app to go a full day in between being called - i.e. testing - then simply modify the Cron expression to be shorter. I did mention this earlier, but you can use the Azure Functions CLI Tools to run your code from within your PC, this can be done at will and should function the exact same as the cloud copy. </NOTE>
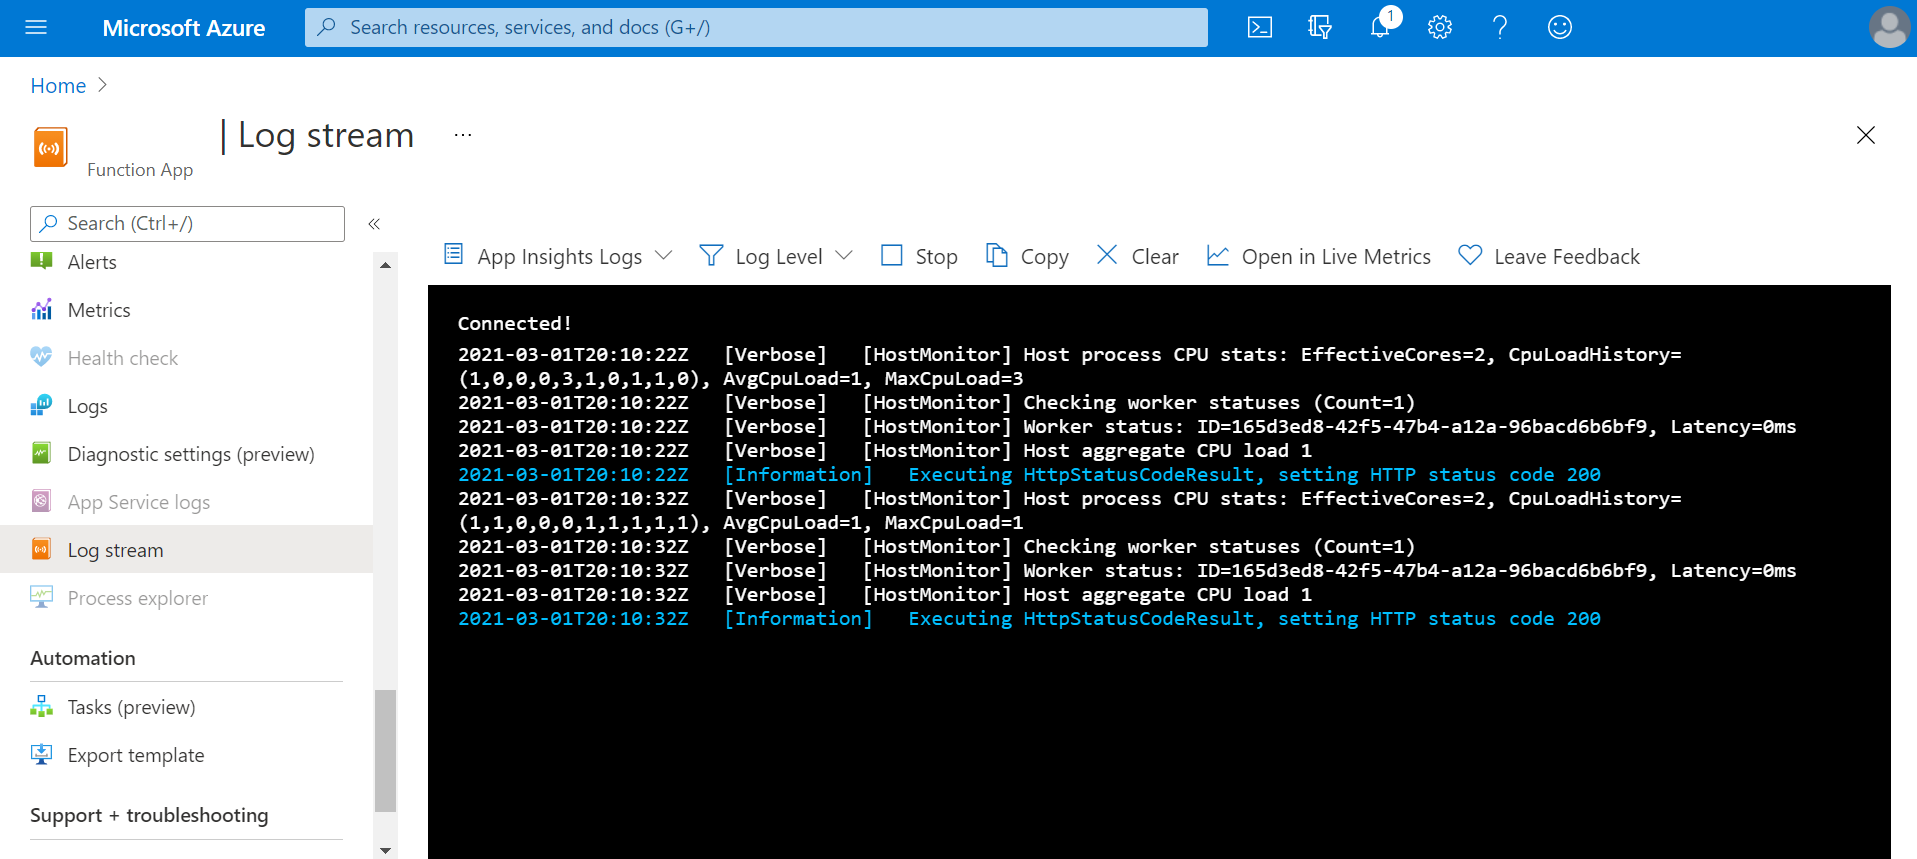
If at any point you want to see the logs (and prints!), right click the myFunctionAppName the same as when you deployed the app, and select Start Streaming Logs. This will take you to the Azure portal where you can see the logs. To get here directly from the portal, find and open your Function App and click Log stream from the left hand side.
Finishing Up
Because we created the new resource in it’s own resource group, we can simply delete it and all of it’s resources with a single delete request. To do this, open up Resource Groups in the Azure Portal and find myResourceGroupName. Here, click on the name of it and select Delete Resource Group, confirm your choice by typing it’s name and then select delete to finalise the action. After a few moments the Resource group will be deleted. Of course, you don’t have to do this - you can keep it live forever, and ever, and ever, and…
An easy project but the applications are vast - think of the things that you want to happen once every ‘now and again’, once a night, twice a day, three times a year, etc.
Happy scripting!
Written on March 2nd , 2021 by Jonny Winter