Jonny Winter
☕
Network engineer, coffee devotee & IT professional
Meraki API & PowerShell - Basics & GET Requests

“The Meraki dashboard itself is a centralized, web browser-based tool used to monitor and configure Meraki devices and services. A dashboard account is what you use to log in to the dashboard in order to manage and configure your organizations, networks, and devices.” - Cisco Meraki
Summary
Using the Meraki Dashboard REST API we can use CRUD (Create, Read, Update & Delete) to interact with the Meraki Dashboard and, in turn, the devices in a programatic way - an alternate method to simply using the web UI. In this post I’m going to show the steps that are required to perform API requests to the Meraki dashboard and display the responses in PowerShell. We’ll then go a bit further and create a script that can be double clicked to present you the list of networks against an organisation with user input.
Requirements
To perform the majority of what we’re going to do below there aren’t many requirements other than having access to PowerShell, a Meraki Dashboard Account and generating your API key. Simple stuff. Once you’re at that point, read on. For reference, I’ll be using Windows PowerShell ISE as it’s built into Windows 10 and easy to use, but you could use another IDE - like VScode.
My Environment
Coffee: House Roast, Original Blend from Union Hand-Roasted Coffee
Music: To The 5 Boroughs by Beastie Boys
OS: Windows 10 Pro v20H2 x64.
Tip o’ the Hat
The Meraki API docs on developer.cisco.com
NetworkEngineer7’s video on YouTube
relxteb’s Meraki GitHub repository
Let’s begin
<NOTE>: Instead of re-inventing the wheel and explaining things that have been well defined by someone else, I have included links next to some words/technologies/acronyms/protocols that I feel could proove useful to those not yet ‘in the know’. </NOTE>
Now you’ve generated your API key and created a dashboard account (if you do not already have these), open PowerShell ISE so we can go about calling the Dashboard REST API. To get started, we are going to perform a GET request to fetch all of the organisations in which your dashboard administrator account has access to - if you have access to the MSP Portal you will return multiple organisations, if not then you will only return one. A GET request is used to retrieve data from a specific resource, like a web server.
In PowerShell, we’re going to be using the Invoke-RestMethod cmdlet to interact with the Meraki Dashboard REST API and storing the returned values in a variable. Once these variables have a value we will then display the values in a nicely formatted table.
Firstly, create a new script (File > Save) and type the following text to store your API key in the $APIKey variable.
$APIKey = "Enter your API key here"
<NOTE>: Storing an API key, as with any credentials, in clear text is a security risk - your API key is effectively your username & password. If a malicious party were to obtain this key, they would be able to authenticate as you. There are many well documented ways on how to secure this in a production environment, i.e. here. This is a purely educational project, do this at your own risk. </NOTE>.
When we communicate with the Meraki Dashboard API, the server requires a few headers are passed along with the URI each request; X-Cisco-Meraki-API-Key, your API key, & Content-Type. The Content-Type header is provided to let the server know that any data sent to the server is provided in JSON (JavaScript Object Notation). In PowerShell, we’ll include both of these in a single variable called $headers - the @ is used when we put data on multiple lines.
$headers = @{
    "X-Cisco-Meraki-API-Key" = $APIKey
    "Content-Type" = "application/json"
}
Now we’ve got our API key & headers defined as variables, we can put them to use in a GET request using Invoke-RestMethod. The switches for the cmdlet are self explanitory - -Uri is the URI, -Headers is the headers & -Method is the CRUD method. Easy mode. The URI we are using is obtained from the Meraki Dashboard API docs, all we need to do is prepend each request with https://api.meraki.com/api/v1.
Invoke-RestMethod -Method Get -Uri "https://api.meraki.com/api/v1/organizations" -Headers $Headers
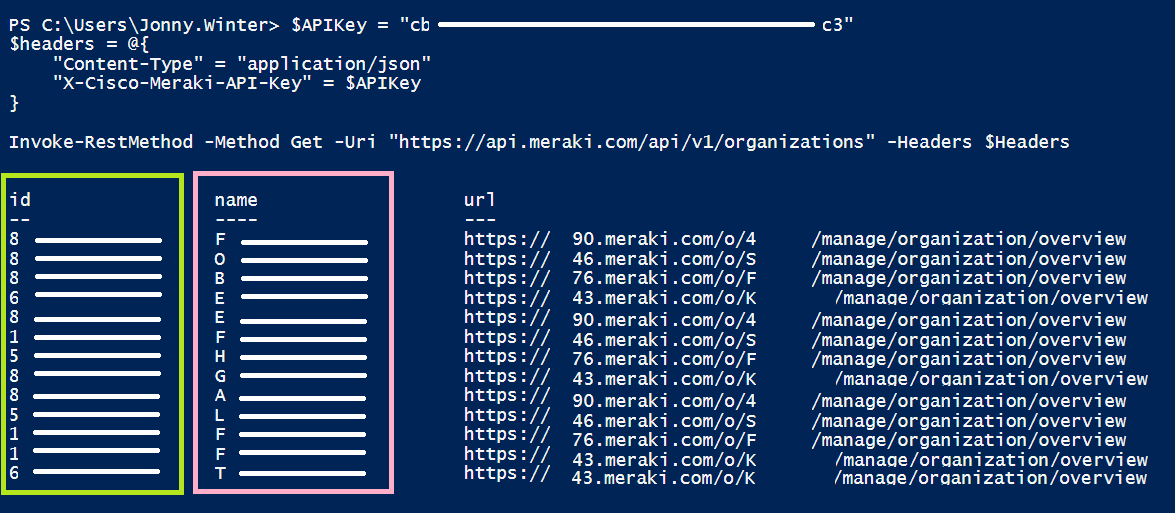
You should receive a response something like this -

What you can see is the organisation name (in the pink rectangle) and the organisation ID (in the green rectangle - unique to the organisation). Using the organisation ID and the same headers as before (included here for completeness), we can do things like displaying the number of networks within the organisation by simply replacing {organizationId} with the organisation ID against the name of the organisation you want to query -
$APIKey = "Enter your API key here"
$headers = @{
    "Content-Type" = "application/json"
    "X-Cisco-Meraki-API-Key" = $APIKey
}
Invoke-RestMethod -Method Get -Uri "https://api.meraki.com/api/v1/organizations/{organizationId}/networks" -Headers $Headers
You should receive a response something like this -
id               : L_Network-ID-1
organizationId   : XXXXX
name             : Network Name 1
productTypes     : {camera, switch, wireless}
timeZone         : Europe/London
tags             : {}
enrollmentString :
url              : https://nXXX.meraki.com/XXXXXXXXXXX/n/XXXXXXXXX/manage/usage/list
notes            :

id               : L_Network-ID-2
organizationId   : XXXXX
name             : Network Name 2
productTypes     : {appliance, switch, wireless}
timeZone         : America/Los_Angeles
tags             : {}
enrollmentString :
url              : https://nXXX.meraki.com/XXXXXXXXXXXXX/n/_XXXXXXXXX/manage/usage/list
notes            :
<NOTE>: Most objects have an ID, this is aparent with the network ID above. Devices use their serial number instead, but unique IDs are common. </NOTE>.
Great! Only thing is, it looks kind-a iffy. So, let’s display it in a table and only display the network ID, organization ID, network name & product types. To do this, put the Invoke-RestMethod request in a variable. Then, call that variable followed by Format-Table cmdlet, like so -
$request = Invoke-RestMethod -Method Get -Uri "https://api.meraki.com/api/v1/organizations/{organizationId}/networks" -Headers $Headers
$request | Format-Table id,organizationId,name,productTypes

###
#Example output below (not script text)
###
id                   organizationId name        productTypes
--                   -------------- ----        ------------
L_Network-ID-1       XXXXXX         Network 1   {camera, switch, wireless}
L_Network-ID-2       XXXXXX         Network 2   {appliance, switch, wireless}
Using a little ingenuity you can make these steps automatic by simply typing in the name of the organisation, finding that name using the if cmdlet and storing the ID relating to it in a variable. You can then place this variable in the Invoke-RestMethod -Uri string and query networks without ever having to type in an ID. The following example is, once saved, easy to run by right-clicking the file and selecting Run with PowerShell.
#----Headers
$APIKey = "Enter your API key here"
$headers = @{
    "Content-Type" = "application/json"
    "X-Cisco-Meraki-API-Key" = $APIKey
}
#----Get the list of organisations
$organisations = Invoke-RestMethod -Method Get -Uri "https://api.meraki.com/api/v1/organizations" -Headers $Headers
#----Display the list of organisations
Out-Host -InputObject $organisations
#----Prompt the user to enter an organisation name and then save the ID of that organisation in a variable
$organisationName = read-host -Prompt "Please type an organisation name"
ForEach ($organisation in $organisations){
    if ($organisation.name -like $organisationName.ToLower()) {
        $organisationId = $organisation.id
    }
}
#----Using that organisation ID, display the list of networks in a formatted table
$networks = Invoke-RestMethod -Method Get -Uri "https://api.meraki.com/api/v1/organizations/$($organisationId)/networks" -Headers $Headers
$networks | Sort-Object Name | Format-Table Name,ID,productTypes
pause
The for loop is a common thing in scripting. In PowerShell the syntax is ForEach and well documented here by Dr Scripto. The lines marked with a # are not processed by PowerShell and the —- are used for ease of visibility.
But yeah, there we go. You can now query all of your networks over all of your organisations via PowerShell using the Meraki Dashboard API. From here, using this/similar method, you can query things like MS switches, switch ports, MR Wi-Fi APs, SSIDs, etc., etc. The destination you’ll need to add to the base URI for each query are found on https://developer.cisco.com/meraki/api-v1.
Happy scripting!
Written on January 10th, 2021 by Jonny Winter